
Creating Piano Reductions in Finale
- Tom Godfrey

- Jul 19, 2021
- 9 min read
Finale has a Piano Reduction plug-in, which I don't use. It can be handy for very simple piano reductions, but in 25+ years of professional music engraving, I find that it takes more time to fix Finale's piano reductions than it does to create them from scratch. Over the years, I've developed an efficient workflow for creating piano reductions, and I've shared that knowledge in three videos. This is a summary of those tutorials.
All examples in these tutorials are from The Divine Image by Nathan R. Lange and published by Santa Barbara Music Publishing (©2020). I'm using this with the permission of Santa Barbara Music Publishing, and no, they are not paying me. I've been engraving music for SBMP for long, long time and have always been impressed with their selection of quality choral music. Check them out at www.sbmp.com.
Part 1: Creating a Workspace and Imploding Music
When I want to create a piano reduction for, say, an SATB choral piece, the first thing I do is add some empty staves below the piano part and copy the voice pitches into them. If I'm creating a reduction for a larger ensemble such as band or orchestra, I'll add more empty staves. I'll use the staves below the piano part as a workspace so I can create a reduction without accidentally messing up the original voice parts. The examples in these videos are from an SATB choral work.
After I've added my scratch staves below the piano, I combine the soprano and alto voices into the piano right hand first. I typically work my way down the voicing or instrumentation, starting from high to low.
I go for the easiest part of the piano reduction first by combining measures in which the soprano and alto have unison rhythms. I usually do this with Finale's Implode Music function. To use Implode Music with the soprano and alto parts, I'll first get into the Selection Tool and highlight piano through alto. Notice that the rhythms are the same in both parts. I only Implode Music with unison rhythms. If you Implode Music when the rhythms are different, Finale will come up with a less than stellar reduction.

Next I'll go to the Utilities pulldown menu at the top of the screen and select Implode Music. By the way, there is a useful keyboard shortcut for this. Instead of navigating this menu to Implode Music, simply type the number "1" key.

The Implode Music dialog box appears. I make sure to click "Top Staff of Selection" so the soprano and alto lines are combined into piano right hand (the top staff of the music I've highlighted) and not into a new staff at the bottom.

After I click OK (or press Enter), the soprano and alto pitches are combined into the piano right hand. After I do this, I always clear the soprano and alto parts from the scratch staves below so I can repeat this procedure with the tenor and bass parts. It's also helpful to delete as I go so I can keep track of which pitches I've added to the piano part and which pitches remain.

I've already mentioned this, but it bears repeating. Only use Implode Music when the rhythms are the same throughout an entire measure in both parts!
If you are getting some unusual rhythmic spellings when Imploding Music, you'll want to check your Quantization Settings. I go into this in the video, so you if you don't know how to adjust Quantization Settings, check out the video.
Once I've Imploded and cleared the soprano and alto parts, I can repeat the procedure to combine the tenor and bass into the piano left hand.
Part 2: Combining Rhythmically Independent Parts
After I add parts with unison rhythms into the piano reduction with Implode Music, I tackle the measures in which the parts have independent rhythms. Again, I work from highest to lowest voice, clearing notes from the scratch staves as I add them to the piano part. In this example, I'm going to combine soprano and alto into the piano right hand.

The first thing I do is move the soprano part to the right hand and then delete it from the scratch staff below.

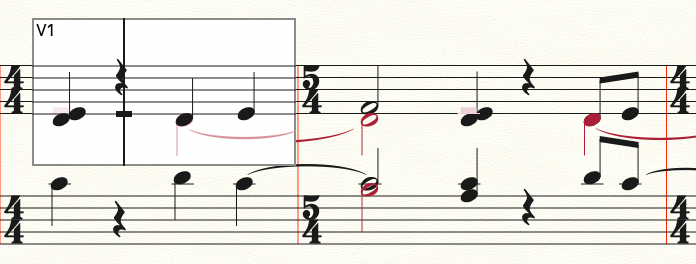
At this point, I've already combined those spots where both parts have the same rhythms throughout the measure. The next step in my process is to combine those PARTS of measures where the rhythms are identical. In the example below, the two parts have the exact same rhythm in the first half of measure 1 and on beat three and four of measure 2. I can combine these beats with the Note Mover Tool

I'll click on the Note Mover Tool in the Main Tool Pallet. It's the icon with the two 8th notes and an arrow. The Note Mover pulldown menu appears. Make sure "Delete After Merge" is selected. Note Mover is a powerful tool, and there are other fun options to explore here. For piano reductions, keep it set on "Delete After Merge." Remember that I like to delete pitches from the scratch staves as I go. When I use Note Mover to move notes from one staff to another and "Delete After Merge" is selected, the notes will automatically be deleted as I go.

Once I'm in the Note Mover Tool, I'll click in a measure where I want to move notes from one part and combine them with another part. Handles appear next to the notes of whichever Layer happens to be active. In the example below, I've clicked on the first measure in the alto part, and those little square handles have appeared next to each note. In the video tutorial, I click and drag that first note into the piano right hand (top measure). I do the same with beat 3 in the next measure.

The next example shows what it looks like after I've clicked and dragged those notes into the piano right hand (top staff). Those notes have been merged into the piano right hand, and they have also been deleted from the original measures because "Delete After Merge" was selected in the Note Mover Tool. (The measures won't be highlighted like this. I highlighted these measures with the Selection Tool to highlight the results of using Note Mover.)

Now we're left with the alto part highlighted below. The rhythms are different from what's been added to the top staff. I want to move this highlighted section from Layer 1 to Layer 2.


To move these notes into Layer 2, I first need to highlight them with Selection Tool as shown above. Then I'll click the Edit pulldown menu at the top of the screen and select Move/Copy Layers.
The Move/Copy Layers dialog box appears. I'll use this box to select "Move" and "Contents of Layer 1 into Layer 2."
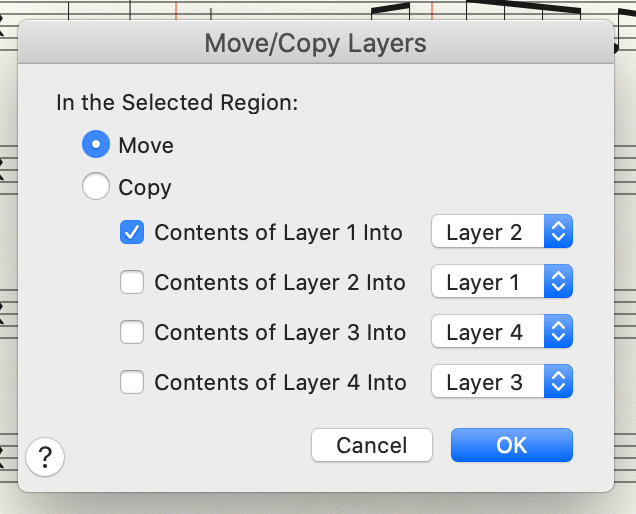
When I click OK or press the Enter key, Finale moves those notes from Layer 1 into Layer 2. Depending on your settings, your Layer 2 might appear in a different color. I have my Layer 1 set to appear in black and my Layer 2 set to appear in red.

Then I can use Note Mover as before to move those Layer 2 notes into the top staff without overriding the Layer 1 notes that are already there. I go through this entire process with the tenor and bass pitches, too.

As you can see in the example above, we have some items to clear up, which we'll do in the next phase – the cleanup.
I used Note Mover to move the alto Layer 2 notes into the piano right hand. Note Mover is pretty fast if you only have to move notes in one or two measures. There is a way to move several measures of Layer 2 into the right hand without overriding the Layer 1 notes that are already in place. I demonstrate how to do this in the second video of this series.
Part 3: Cleanup
Here's what this section of the piano reduction looks like so far. There are some unwanted rests in Layer 2, some rests in Layer 1 are floating too high, and a few stems in measure 2 of the left hand are pointing the wrong direction. If a piano reduction includes more than one Layer, chances are you'll need to adjust or hide rests and flip some stems and ties. You can do this easily using Speedy Entry or Special Tools.

Before I do any of that, I want to delete the scratch staves I added below the piano part.


I can do this with the Staff Tool, which is the treble clef icon in the Main Tool Pallet.
While in the Staff, I'll highlight the empty staves below the piano part. I want to highlight the entire line. To do this, I click in the left margin of the highest staff I want to delete. This highlights the entire part. Then I Shift+Click the lowest staff. This highlights all four staves throughout the entire score.

To delete these staves, I can either Control+Click or Right Click one of the highlighted staff handles shown above and select "Delete Staves and Reposition." Alternately, while those staves are highlighted, I can go to the Staff menu at the top and select "Delete Staves and Reposition." Notice the keyboard shortcut shown in the example below. You could also simply press Command+Delete to get rid of those empty staves. There's always more than one way to do something in Finale.

Now I want to hide or delete the unwanted rests in Layer 2. I use Speedy Entry to do this. First, I click on Speedy Entry in the Main Tool Pallet – the 8th note icon with the little "speedy" lines.

Since the unwanted Layers are in Layer 2, I need to make sure Layer 2 is my active layer. In the very bottom left of the active window, you'll find a window that tells you which layer you're in. You can use that little menu to select a layer, or you can go to the View menu at the top and navigate to "Select Layer." Notice the keyboard shortcuts in the example below. The fastest way to switch layers is to press Command+Option+1 to active Layer 1, Command+Option+2 to active Layer 2, etc. I'll switch to Layer 2 with the Command+Option+2 shortcut.

Now that I'm in Layer 2 and still in Speedy Entry, I'll click on the first measure of this section. The Speedy Edit box appears. I make sure my cursor is lined up with the half rest on beat 1 in Layer 2. Then I'll press the "H" key to hide it. I'll do the same with the unwanted rests in the other measures.

Here's what this section looks like after I've hidden the rests. We can still see them faintly, so we know they're there, but they won't show up when I print or generate a PDF or graphic file.

The quarter rests in most of these measures are floating too high because of the notes in Layer 2. I'll switch back to Layer 1 with Command+Option+1. Then I'll move the cursor so it lines up with a quarter note and press Shift+8 to move the rest down to the proper position. If you are using an extended keyboard, you can press the asterisk key [*] on the numeric keypad to move the rests.
Here's what this section looks like after I've moved the rests to the correct position.

Some stems in the left hand, measure 2, are pointing the wrong way. I want to flip the stems on beats 3 and 5 down. To do that, I'll use Special Tools. (In video #3, I show how to do this with Speedy Entry, too.) I click on the Special Tools tool in the Main Tool Pallet. That'll be the little wrench.

The Special Tools Pallet appears. Then I click on the Stem Direction Tool, which is the note with up and down arrows and stems.

While in the Stem Direction Tool, I'll click on the measure with the bad stemming. Handles appear above and below the staff.

To flip a stem down, I click a handle below the staff. By the way, handles only appear for the currently active layer. If I wanted to flip a stem in Layer 2, I would first need to activate Layer 2.

When I flipped the stems on beat 5, the tie unfortunately flipped as well. I want to flip that tie up. While in Special Tools, I'll click on the Tie Tool in the Special Tools Pallet – the three notes with ties.

When I click the Tie Tool, handles appear on all ties for the currently active layer. I'll select a handle or two for the tie I want to flip. I only need to select one handle.

With at least one handle selected, I press Command+F to flip the tie back up.

After cleaning up rests, stems, and ties, here's what this section of the piano reduction looks like right now. There are still some note spacing issues, but I haven't added lyrics yet. Lyrics will affect the note spacing, so there there would be no sense applying note spacing now unless the notes were so close together that working with lyrics would be difficult.

One other issue I would deal with is the doubled D-flats in measures 2 and 3. Normally I wouldn't want the same note to appear in both the right and left hand parts. This is a judgement call, but to me it makes musical sense to keep the note doubling in place. With this in mind, I would add parentheses around the D-flats in the left hand in measures 2 and 3. I demonstrate this and go into further details in the third and final video of this series.
Wrap-Up
There is always more than one way to do anything in Finale. By the same token, there are other ways to create a piano reduction. I've shown you the approach I've developed over the course of 25+ years of professional music engraving. My suggestion is to try some of these techniques and use what works best for you.
If you have questions, comments, or Finale tips of your own, please leave a comment. I've been using Finale for a long time, but there's always more to learn!

Comments